![]()
All articles on UiPath
Let's use an example to see exactly how we can add UiPath automation to a conversation. In this article we will show an example of such an integration by connecting a UiPath OCR bot to a Cognigy Flow.
We assume you have already set up the other steps for UiPath integration.
Sending Data via JSON to UiPath Process
In order to receive information back from the UiPath automation we must send it the proper information in JSON format to the bot. In this case we must add at least the following information into the Input Arguments field of the Start a Job Node.
{
"userId": "{{ci.userId}}",
"URLToken": "{{ci.URLToken}}",
"sessionId": "{{ci.sessionId}}"
}
These are all fields required later to trigger the Inject function of the Cognigy API.
In our example we are also adding one additional attribute with the JSON object of the image we will be uploading via our File Upload Webchat Plugin.
"imageURL": "{{ci.data.file}}"
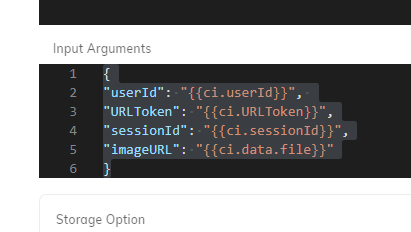
Figure 1: JSON field in Start a Job Node
Setting up UiPath Process to Receive Data
After setting up the Cognigy flow to send data to the process we have to set up the UiPath process to receive and process this information.
To do this we need to add each of the JSON objects as arguments to the UiPath process. Each of these arguments should have the same name as the JSON objects. Please pay attention to the capitalization of the names in the arguments.
They should have the Argument Type string and the Direction should be In.
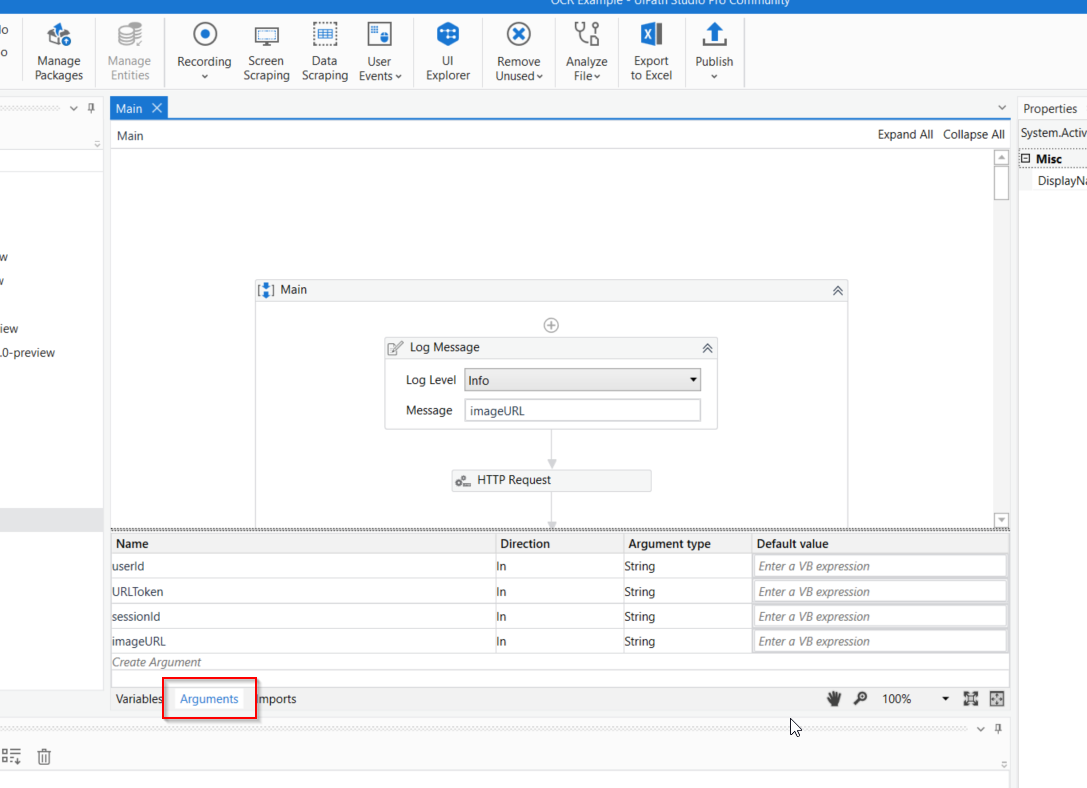
Figure 2: Arguments Field in UiPath Process
Retrieving Image for OCR
In our example UiPath also requires an image to process. Because we are only sending the URL of the location where the image has been uploaded we will need to tell the UiPath process to download the file for the OCR.
In order to do this you will need to have the UiPath Web API Activities Package installed in your process. If this is installed you will need to add the HTTP Request activity.
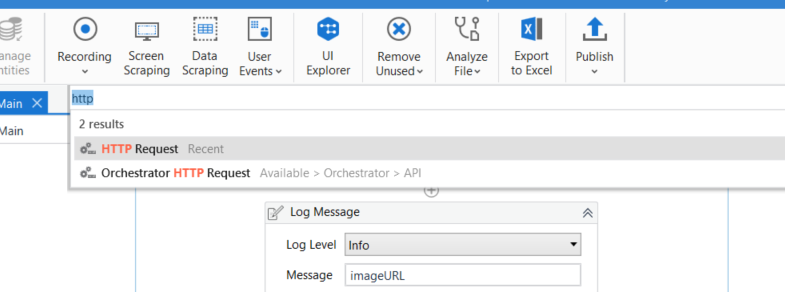
Figure 3: Arguments Field in UiPath Process
The HTTP Request WIzard will then pop up. In the End Point field enter the name of the JSON object of the image, in our case imageURL. As a Request Method choose "GET" and click "Ok".
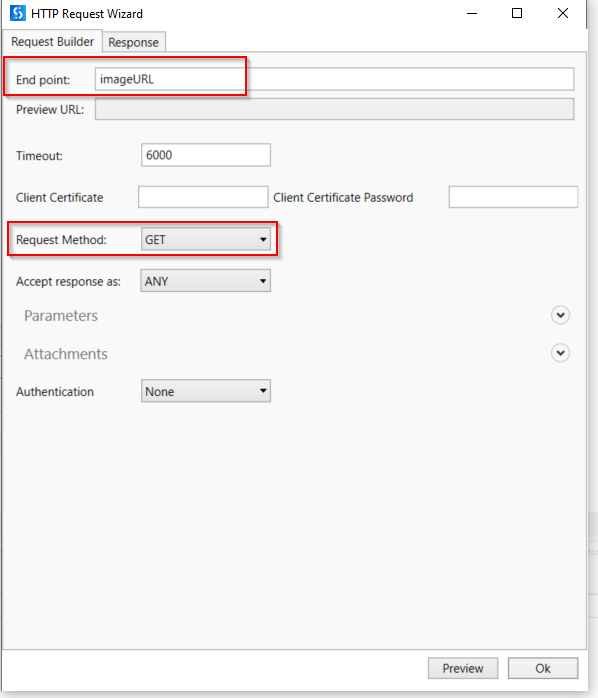
Figure 4: HTTP Request Wizard in UiPath
Afterwards if you click on the activity you should see it's properties on the right side of the window. You will need to add a path where the file for processing should be downloaded in the field "ResourcePath".
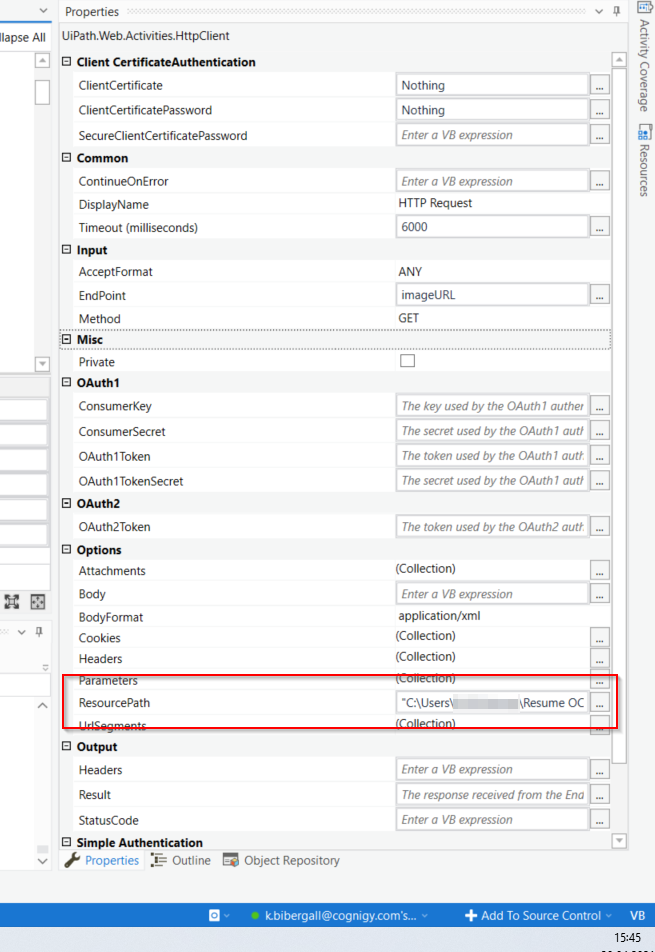
Figure 5: Properties of HTTP Activity in UiPath
Sending Information Back to Cognigy
With HTTP Request Step
After processing the information via you will want to send the information back to the Cognigy Chat session. This will also be done by adding an HTTP Request activity, but this time at the end of the process.
Figure 6: Arguments Field in UiPath Process
The HTTP Request Wizard will once again appear, but this time we will be using the request method Post.
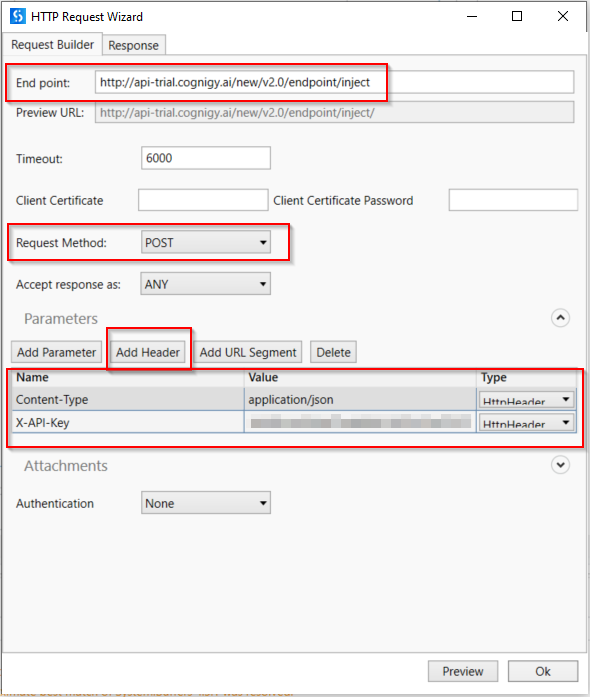
Figure 7: HTTP Request Wizard to send information back to Cognigy
In End point we will add the URL of the API function we wish to use. In this case it is an input inject in the trial environment.
The Request Method is Post.
Under Parameters click on the Add Header button and add two headers. One is called Content-Type with the value application/json the other should be called X-API-Key and its value should be an API key which you can create in your profile.
After setting up the basics you will also need to add a JSON body to the HTTP request in order to define which information should be sent. In this case we will be defining the JSON body as a separate activity. Doing this separately helps us to debug later, for example by adding the contents of the activity to the process log before it reaches the HTTP request activity.
To add the JSON body we will first need to add an Assign activity before your HTTP request.

Figure 7: Choose Assign activity from the list
After adding the activity we will need to define what the JSON body should be called (in this case simply jsonbody). It will then show up as a variable in UiPath Studio and should have the Variable type String and the Scope should be Main.
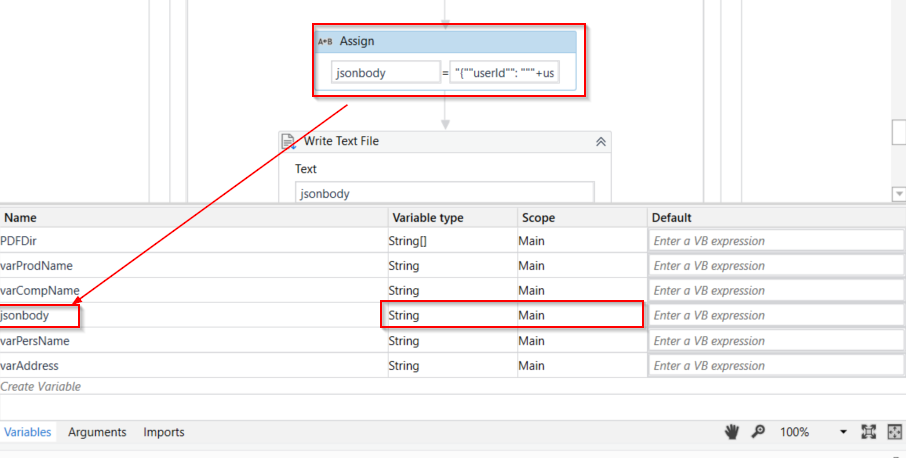
Figure 8: Assign activity and its properties in the process
After adding the assign activity we now must define what information should be sent back to Cognigy. Because we can't add information in JSON format directly to the HTTP request we will need to reformat it for UiPath specifications.
Click on the + in the assign activity and choose Open in Advanced Editor. We will than enter a string using the following pattern:
"{""userId"": """+userId.ToString+""",""text"": """+varPersName.ToString+""",""data"": { ""varName"": """+varPersName.ToString+""", ""varAddress"": """+varAddress.ToString+""" },""URLToken"": """+URLToken.ToString+""",""sessionId"": """+sessionId.ToString+"""}"

Figure 9: JSON converted to VB
The information in text and data can be changed based on your use case but we have added information we will be extracting via OCR from a document.
Please Note: The JSON must be written as one long string. If you use paragraph breaks or anything similar it will not work.
The assigned JSON body can than be added to the properties of the HTTP request under Options. In Body simply add the name of the string you wish to add and in BodyFormat enter application/json.
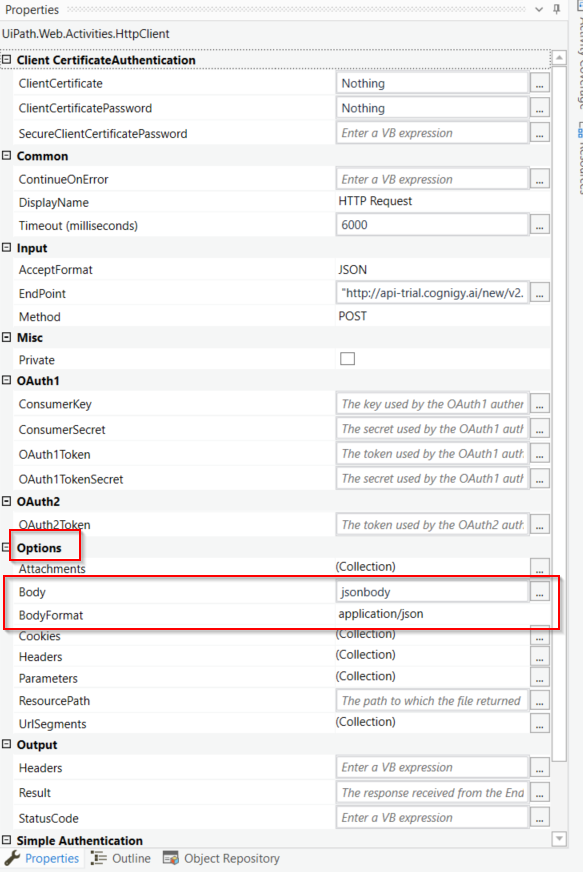
Figure 10: JSON Body in HTTP Post request properties
With UiPath Cognigy.Connectivity Activity in the process
If you have the Cognigy Connectivity activity installed sending information back is a lot simpler.
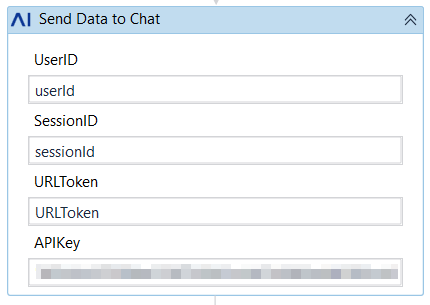
Figure 11: Send Data to Chat Activity in Process
In the UserID, SessionID and URLToken fields simply add the variables in your arguments as shown above.
The APIKey is added as a string and can be found in your profile.
You should also add additional information to the properties.
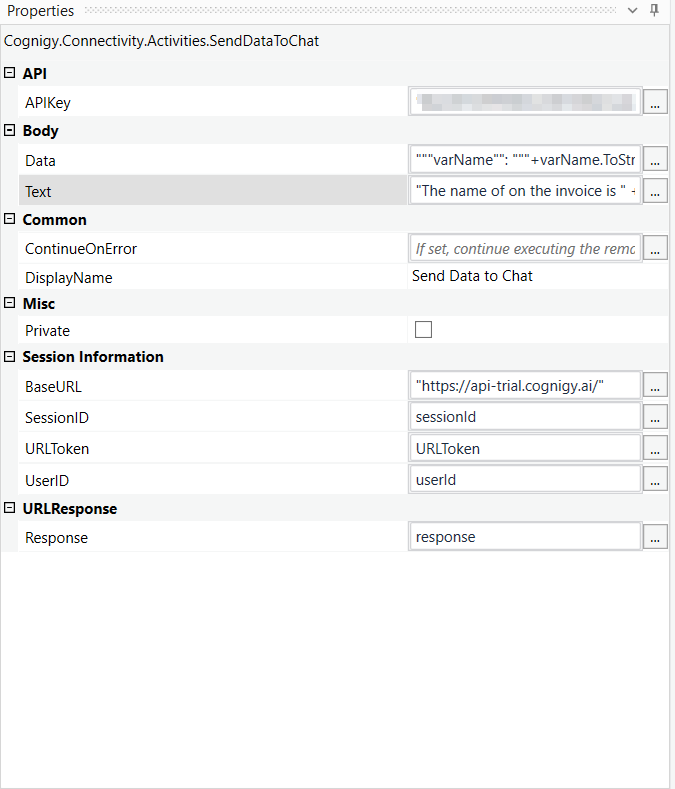
Figure 12: Send Data to Chat Properties
In the body you can both add Text as well as a Data object.
Text can be sent as a simple string. You can also add variables to the string using the .ToString function. For example:
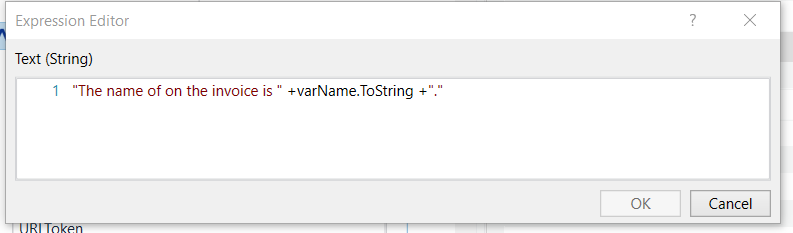
Figure 12: Send Data to Chat Text Expression Editor
"The name of on the invoice is " +varName.ToString +"."
This is much easier than sending the text as part of a JSON with escape quotes. However, if you wish to send a Data object you will need to convert your string JSON variables to a VB string in order to send the data.
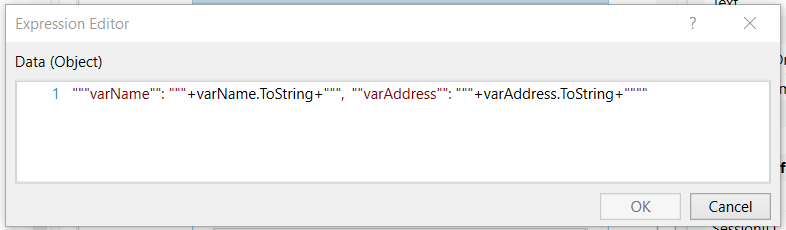
Figure 12: Send Data to Chat Data Expression Editor
"""varName"": """+varName.ToString+""", ""varAddress"": """+varAddress.ToString+""""
This is only necessary though if you wish to send information in addition to the text as a data object, which depending on the use case might be necessary.
The BaseURL is the Cognigy environment you are working with as a string. In this case we are using the trial environment so the base URL is "https://api-trial.cognigy.ai/", however this might be different in the our SAAS environment ("https://app.cognigy.ai/") or an on-premise environment.
The Response in URLResponse is for debugging. It allows you to see a response with the response from the Cognigy API.
Integrating into Endpoint via Cognigy Agent
Now that we have setup UiPath to both process and send information to and from a Cognigy flow let's setup out flow so the agent actually says the information is receives.
The first thing you will need to do is add a Wait for Input node after the Start a Job node of your flow. This node ensures that the flow does not continue until the information has been injected as an input from your UiPath process.
After the Wait for Input node we can then add a Say node with the information from the OCR you wish to the agent to say.
We already know based that the information will be injected into the input. If you are injecting the information as "text" you can simply add
{{input.text}}
to your say node. In our case though we sent two datasets as data. These will then injected into the input with the following pattern:
{{input.data.VariableFromUiPath}}
In the end your flow should look similar to the image below.
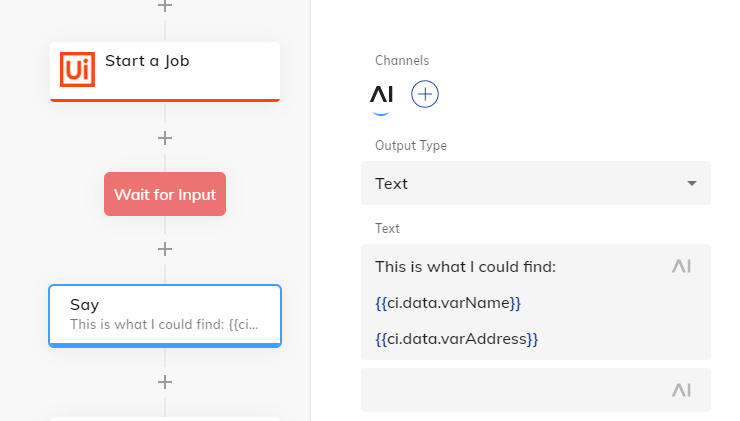
Figure 11: Properly setting up the Wait for Input and Say nodes to receive information from UiPath
This information will than be available in any channel (such as Webchat or Microsoft Teams) compatible with the Congigy OpenAPI functionality.
In the webchat it would look something like this.
Comments
0 comments